
Packing a hiking backpack isn’t just about stuffing things inside and hoping for the best. It takes time finding what packing routine works best for you and suits you best while hiking. Proper packing can make your adventure way more pleasant and keep you from dealing with unnecessary aches or annoyances.
When you pack your backpack thoughtfully, a few things happen. You distribute weight evenly, which is super important for maintaining balance and agility. It also makes grabbing what you need way easier, reducing the time you spend rummaging around.
Think about it, you’re out in the wild and need something quickly. If your gear is all over the place, it’s a hassle. But if your backpack is organized, you can get what you need in no time, keeping you on the move.
A well-packed backpack means you’re prepared for whatever comes your way, whether it’s navigating rough terrain or whipping out a snack. Plus, it can prevent gear damage by protecting delicate items with softer gear.
So, as we dive into the details, remember: packing smart is packing to succeed. Ready to hit the trails with a backpack that works for you, not against you? Let’s get started.
Essential Gear and Items for Hiking
When gearing up for a hike, you gotta have more than just enthusiasm. Packing wisely ensures you’re ready for everything Mother Nature throws your way. Here’s a rundown of must-have hiking essentials.
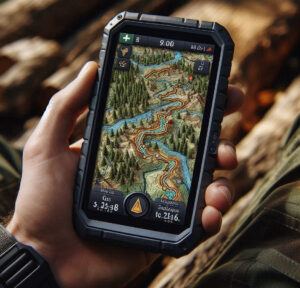
1. **Navigation Tools:** At the top of the list are navigation tools like a map, compass, or GPS device. Even if you’re hiking on a well-trodden path, it’s good to know where you are and where you’re headed.
2. **Hydration Systems:** Staying hydrated is crucial. Carry a water bottle or hydration reservoir. A filtering device can be a lifesaver if you’re hiking for several days.

3. **Weather-Appropriate Clothing:** Layering is key. Wicking layers to keep sweat away, waterproof layers for rain, and insulating layers for warmth. Don’t forget a hat and gloves if you’re in colder climates.
4. **First-Aid Kit:** Accidents happen, and it’s best to be prepared. Stock your kit with band-aids, antiseptic wipes, blister treatment, and any personal medication.
5. **Multi-tool or Knife:** Whether for meal prep, gear repair, or emergency situations, a multi-tool or knife can be incredibly versatile.

6. **Light Source:** A headlamp or flashlight is essential, even for day hikes. Always pack extra batteries.

7. **Fire-Starting Supplies:** Matches, a lighter, or a fire starter. It can be handy for emergencies or simply to enjoy an evening campfire.
8. **Food Supply:** High-energy snacks like trail mix, nuts, and dried fruits. For longer hikes, consider lightweight meals like dehydrated foods.
9. **Shelter:** Whether it’s an emergency bivvy, a lightweight tent, or a tarp, some form of shelter is necessary if things go south.
10. **Sun Protection:** Sunblock, sunglasses, and lip balm with SPF. Trust me, you don’t want to learn about sunburn the hard way.
11. **Backpack:** Last but not least, a good quality backpack to carry all these essentials comfortably. Make sure it’s the right size for your gear and fits you well.
Selecting the right gear sets the foundation for a great hiking experience. Remember, it’s not about carrying everything but about carrying the right things.
Mastering the Three Packing Zones
Understanding where to place your gear can make all the difference on a hike. Your backpack’s space is generally divided into three key zones: the bottom zone, the core zone, and the top zone. Each has its own purpose and knowing what to pack in each can optimize your experience.
**Bottom Zone:** This is where you stash bulky items you won’t need until you set up camp. Think of it as your backpack’s basement. It’s perfect for sleeping bags, camp shoes, or any layers like long underwear, that you plan to sleep in. These items provide a solid base and help stabilize the rest of your load.
**Core Zone:** This is the heart of your packing strategy. Heavy and dense items go here. They should be close to your back as possible to maintain a low center of gravity. Think food supplies, cooking gear, water reservoir, bear canister, and tent bodies. Balance is key, so distribute the weight evenly across this zone.
**Top Zone:** This area is all about easy access. Stuff you might need on the go, like a rain jacket, first-aid kit, water filter, toilet supplies, or snacks, go here. Items stashed in this zone should be light and often used. Quick access means you won’t waste time digging through your pack when nature calls.
Knowing what to pack in each zone helps distribute weight efficiently and keeps you organized. You’ll notice a real difference in how your body handles the load and how accessible your gear is during the hike. Proper organization isn’t just about convenience; it’s about enhancing your entire hiking experience.
Utilizing Accessory Pockets, Tool Loops, and Lash-on Points
Accessory pockets can save you a lot of hassle, especially when hiking. Think of these as your pack’s quick-draw compartments. Items like maps, snacks, sunscreen, GPS, bug spray, headlamp, and even your phone should go here. You want stuff you use frequently or might need urgently within easy reach. That way, you don’t have to dig through your main compartments every time you need something.
Tool loops are those nifty little straps you’ll see hanging off your pack. They’re perfect for carrying hiking poles, ice axes, or even a tripod if you’re into photography. Tool loops keep these awkwardly shaped items secure and out of your way, but still easily accessible when you need them.
Lash-on points are the external attachment places for bulky or odd-shaped items you can’t fit inside. Think sleeping pads, wet clothing, or even your tent poles. By lashing these to the outside, you free up space inside your pack and keep items that can withstand the elements more accessible.
An organized backpack isn’t just efficient; it’s also a game-changer when you’re on the trail. Imagine needing a quick snack or a map check—all it takes is a quick unzip. Or needing to drop your tent after a rainy night—just unlash and pack it down.
Hoisting and Adjusting Your Loaded Backpack
How you lift and adjust your backpack can make or break your day on the trail. To start, place your packed backpack on the ground and loosen all the straps. Stand with your feet shoulder-width apart and bend your knees. Lift the backpack by grabbing the haul loop (the strap at the top) and place it on one knee. This way, you’re using your legs, not your back, to lift the weight.
From there, slip one arm through the shoulder strap, then the other. Stand up straight and give your shoulders a little wiggle to settle the pack into place. Once it’s on, start adjusting: tighten the shoulder straps first to bring the pack close to your body. Then, adjust the hip belt so it sits snugly on your hip bones. The majority of the pack’s weight should rest on your hips, not your shoulders.
Next, adjust the load lifters—small straps that connect the top of your shoulder straps to the top of the back panel. These should form about a 45-degree angle. This step helps keep the pack’s weight close to your body, improving balance and reducing strain.
Finally, make sure the sternum strap is fastened across your chest. It helps distribute weight and keeps the shoulder straps from slipping. Take a few practice steps to ensure everything feels right. If it’s uncomfortable, don’t hesitate to readjust; minor tweaks can make a huge difference.
When properly hoisted and adjusted, your backpack should feel like an extension of your body, evenly distributing weight and allowing you to move freely. Your hiking experience should be enjoyable, not a slog. So, take the time to adjust, and you’ll thank yourself later when you’re miles into your hike and feeling strong.